NFT frontend application
This article explains how to create a React application and connect it to an NFT smart contract running in the blockchain.
Preparation
-
First clone the frontend-starter. Install NodeJs and NPM. Make sure you have the latest LTS version of the NodeJs installed.
-
Then install yarn:
yarn install -
There is an
.env.examplefile. Create your own.envfile and copy the contents of.env.exampleto your.envfile. It contains the following variables:REACT_APP_NODE_ADDRESS: This variable defines the node we'll be working on.REACT_APP_CONTRACT_ADDRESS: The address of the contract uploaded to the chain.REACT_APP_IPFS_ADDRESSandREACT_APP_IPFS_GATEWAY_ADDRESS: These variables are needed when uploading media files to IPFS.
-
Upload the contract to the chain and set up the address in the
.envfile. Place themeta.txtfile in theassets/metafolder and thenft_state.meta.wasmfile in theassets/wasm folder. -
Run the application:
yarn start -
The main file
App.tsxis simple:import { useApi, useAccount } from '@gear-js/react-hooks';
import { Routing } from 'pages';
import { Header, Footer, ApiLoader } from 'components';
import { withProviders } from 'hocs';
import 'App.scss';
function Component() {
const { isApiReady } = useApi();
const { isAccountReady } = useAccount();
const isAppReady = isApiReady && isAccountReady;
return (
<>
<Header isAccountVisible={isAccountReady} />
<main>{isAppReady ? <Routing /> : <ApiLoader />}</main>
<Footer />
</>
);
}
export const App = withProviders(Component);It checks whether the application is connected to the chain:
const { isApiReady } = useApi();It checks whether the account is connected to the application through the web extension:
const { isAccountReady } = useAccount(); -
If the
apiis ready and theaccountis connected, it displays the application's pages. Navigate to the pages folder. The project has only one pageHome. Theindex.tsxfile is also simple:import { Route, Routes } from 'react-router-dom';
import { Home } from './home/Home';
const routes = [
{ path: '/', Page: Home },
];
export function Routing() {
const getRoutes = () => routes.map(({ path, Page }) =>
<Route key={path} path={path} element={<Page />} />
);
return <Routes>{getRoutes()}</Routes>;
}
Create-NFT page
-
Create a page for NFT creation using the code below:
mkdir src/pages/create-nft
touch src/pages/create-nft/CreateNft.tsx -
Then move the file with styles from
assetsfolder to thecreate-nftfolder:mv src/assets/styles/CreateNft.module.scss src/pages/create-nft -
Start writing the
CreateNft.tsx:import styles from 'CreateNft.module.scss'
export function CreateNft() {
return (
<div>Create NFT</div>
)
} -
Declare this page in the
index.tsxfile and also add the route for it::import { Route, Routes } from 'react-router-dom';
import { CreateNft } from './create-nft/CreateNft';
import { Home } from './home/Home';
const routes = [
{ path: '/', Page: Home },
{ path: '/create-nft', Page: CreateNft },
];
export function Routing() {
const getRoutes = () => routes.map(({ path, Page }) =>
<Route key={path} path={path} element={<Page />} />
);
return <Routes>{getRoutes()}</Routes>;
} -
Create a link to the
CreateNftpage from theHomepage. In theHome.tsxfile, write:import { Link } from "react-router-dom";
function Home() {
return (
<Link to="/create-nft">
<h3>Create NFT</h3>
</Link>
)
}
export { Home }; -
Go back to the
CreateNftpage. Create a form that includes the NFTtitle,description, andimage:import { Button, FileInput, Input } from '@gear-js/ui'
import styles from './CreateNft.module.scss'
export function CreateNft() {
return (
<>
<h2 className={styles.heading}> Create NFT</h2>
<div className={styles.main}>
<form className={styles.from}>
<div className={styles.item}>
<Input label="Name" className={styles.input} required/>
</div>
<div className={styles.item}>
<Input label="Description" className={styles.input} required/>
</div>
<div className={styles.item}>
<FileInput label="Image" className={styles.input} required/>
</div>
<Button type="submit" text="Create" className={styles.button}/>
</form>
</div>
</>
)
} -
Create a state that will store the NFT's title, description, and image, and add the functions
handleInputChangeandhandleImageChangethat will update this state:import { Button, FileInput, Input } from '@gear-js/ui'
import { useState } from 'react'
import styles from './CreateNft.module.scss'
const NftInitialState = {
title: "",
description: "",
}
export function CreateNft() {
const [nftForm, setNftForm] = useState(NftInitialState);
const [image, setImage] = useState<File | null>(null)
const { title, description } = nftForm;
const handleInputChange = (e: React.ChangeEvent<HTMLInputElement>) => {
const { name, value } = e.target;
setNftForm(prevForm => ({...prevForm , [name]: value}))
}
return (
<>
<h2 className={styles.heading}> Create NFT</h2>
<div className={styles.main}>
<form className={styles.from}>
<div className={styles.item}>
<Input label="Name" className={styles.input} required name="title" value={title} onChange={handleInputChange}/>
</div>
<div className={styles.item}>
<Input label="Description" className={styles.input} required name="description" value={description} onChange={handleInputChange}/>
</div>
<div className={styles.item}>
<FileInput label="Image" className={styles.input} onChange={setImage}/>
</div>
<Button type="submit" text="Create" className={styles.button}/>
</form>
</div>
</>
)
} -
Add the image preview for the uploaded image:
...
export function CreateNft() {
    ...
    return (
        <>
            <h2 className={styles.heading}> Create NFT</h2>
            <div className={styles.main}>
                <form className={styles.from}>
                    ...
                    <div className={styles.item}>
                        <FileInput label="Image" className={styles.input} onChange={setImage}/>
                        { image ? (
                            <div className="image-preview">
                                <img src={URL.createObjectURL(image)} alt="nft" style={{width: 100, height: 100}}/>
                            </div>
                        ): (
                            <p>No image set for this NFT</p>
                        )}
                    </div>
                    <Button type="submit" text="Create" className={styles.button}/>
                </form>
            </div>
        </>
    )
}
Upload image and mint NFT
- Next, we upload the image to IPFS and send a
Mintmessage to the contract.
Upload the image to IPFS and send a Mint message to the contract. Install the IPFS Desktop App.
-
Navigate to
Settings: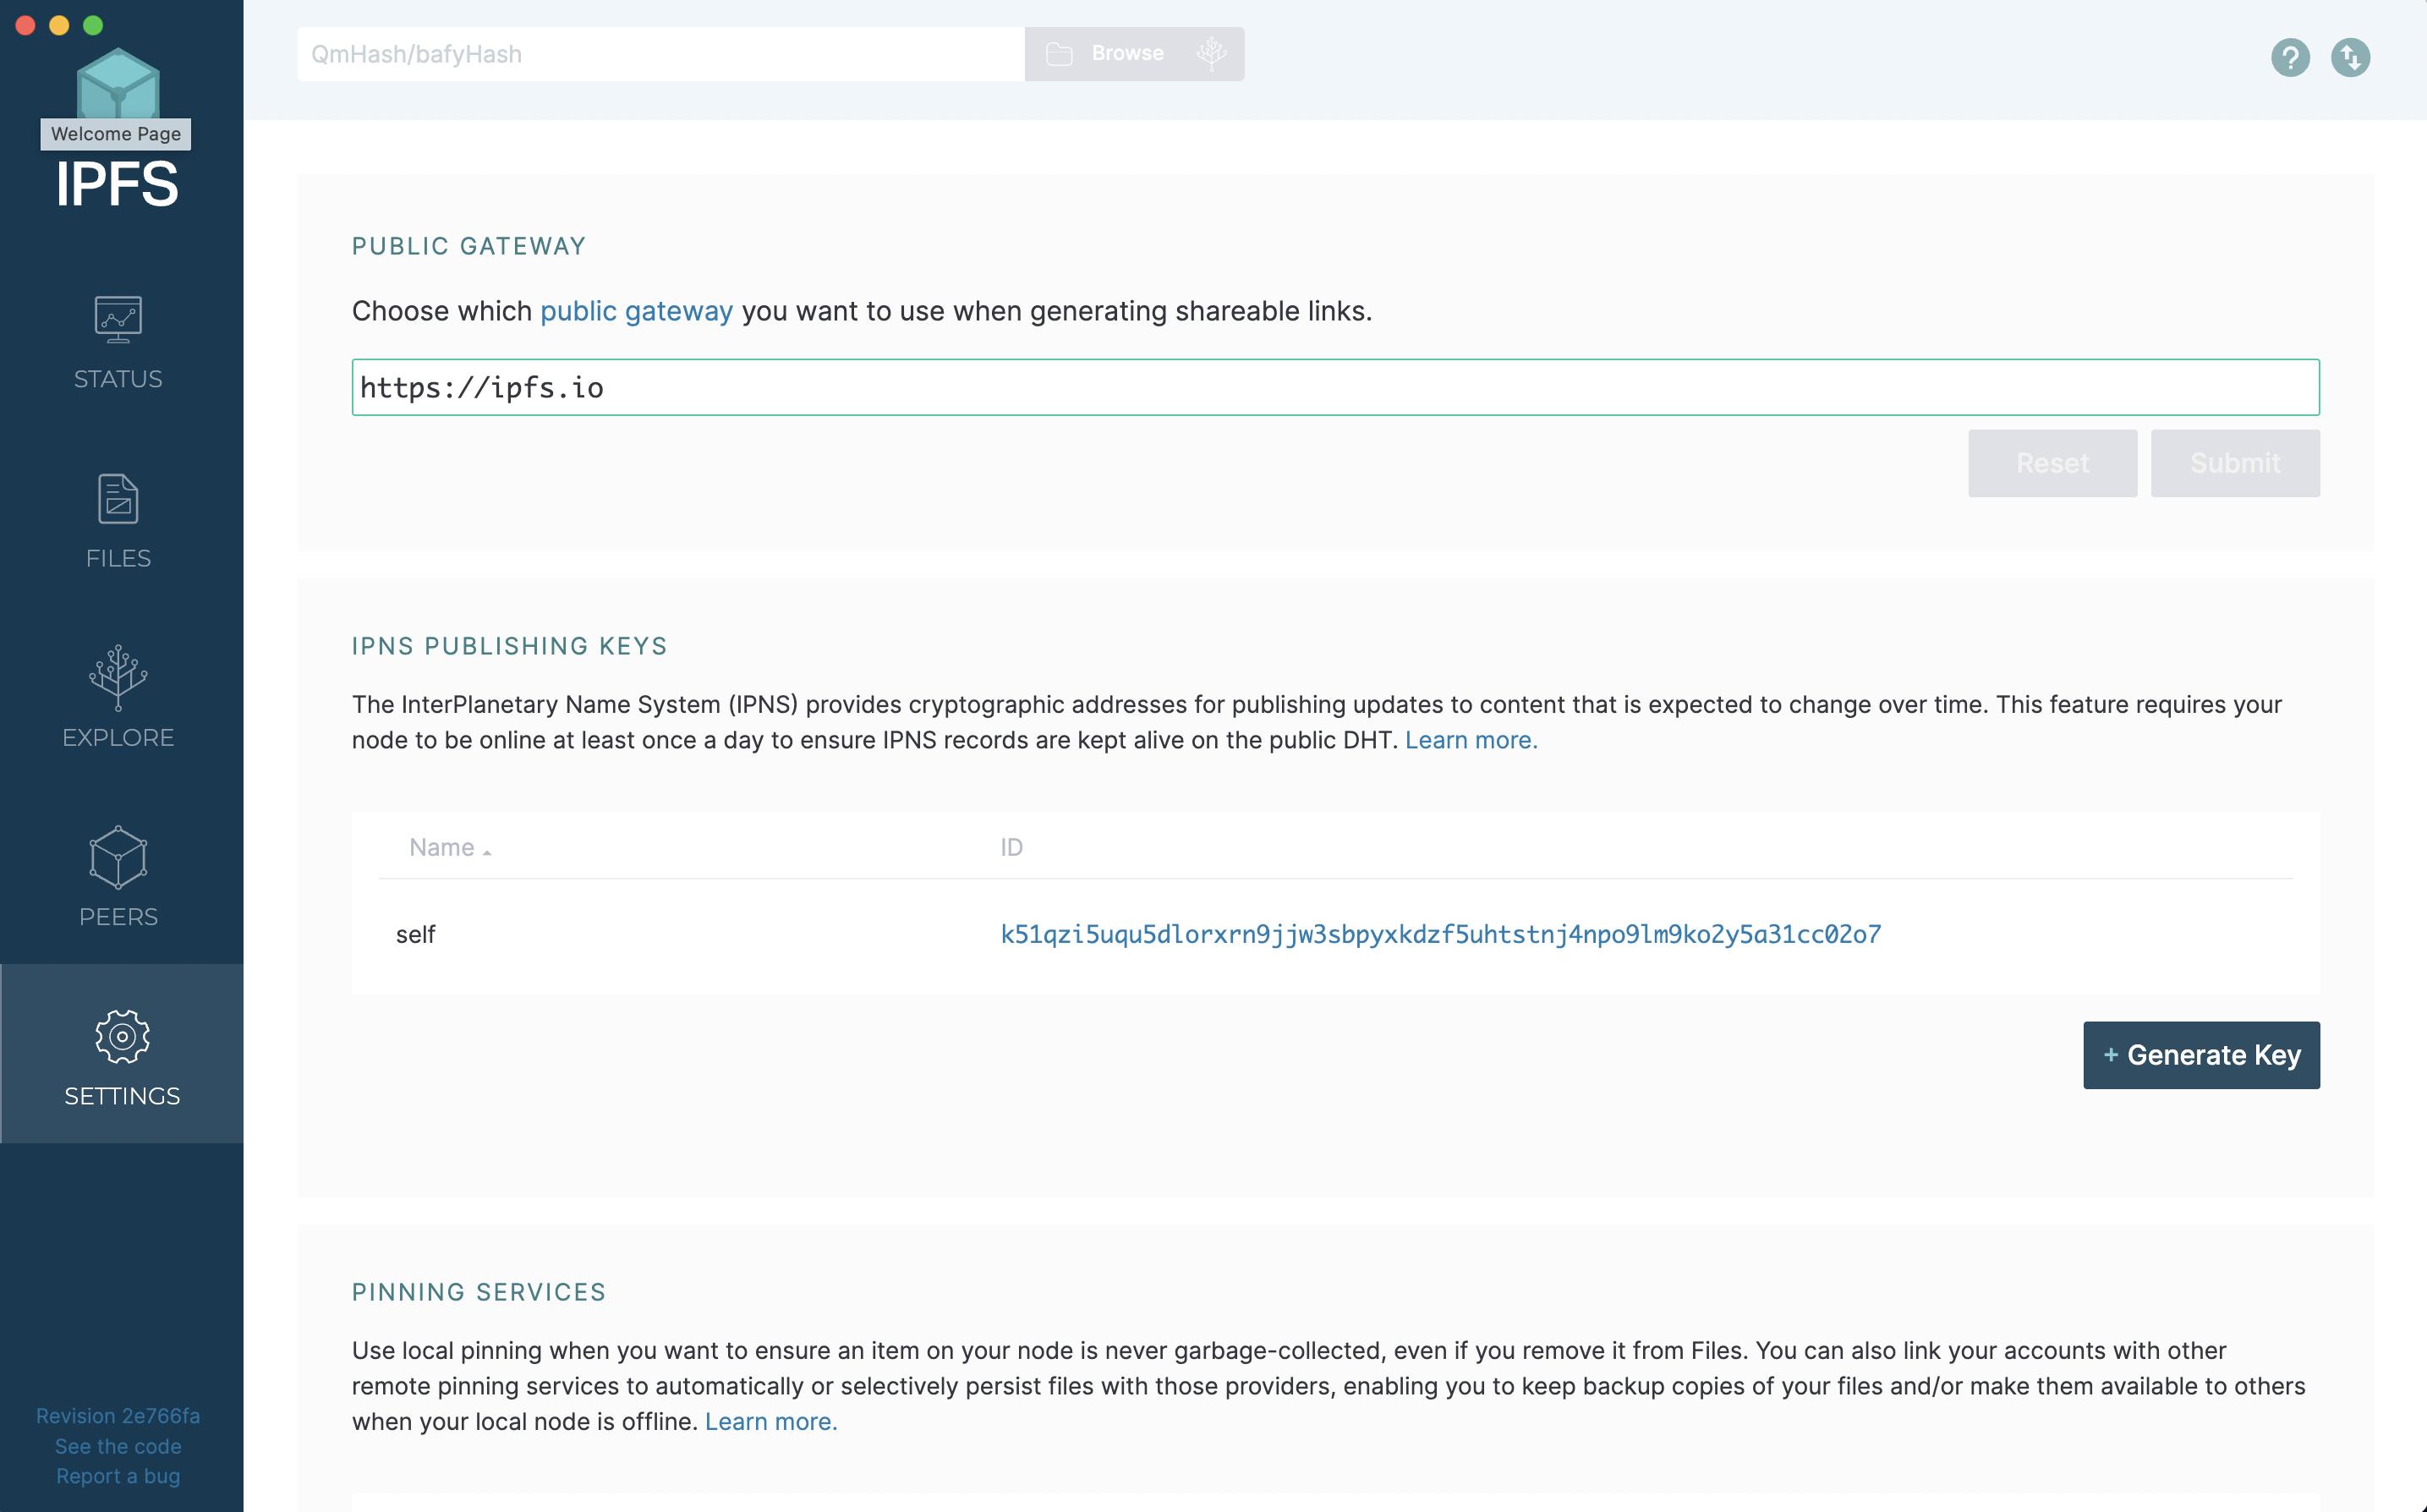 Locate
 IPFS config: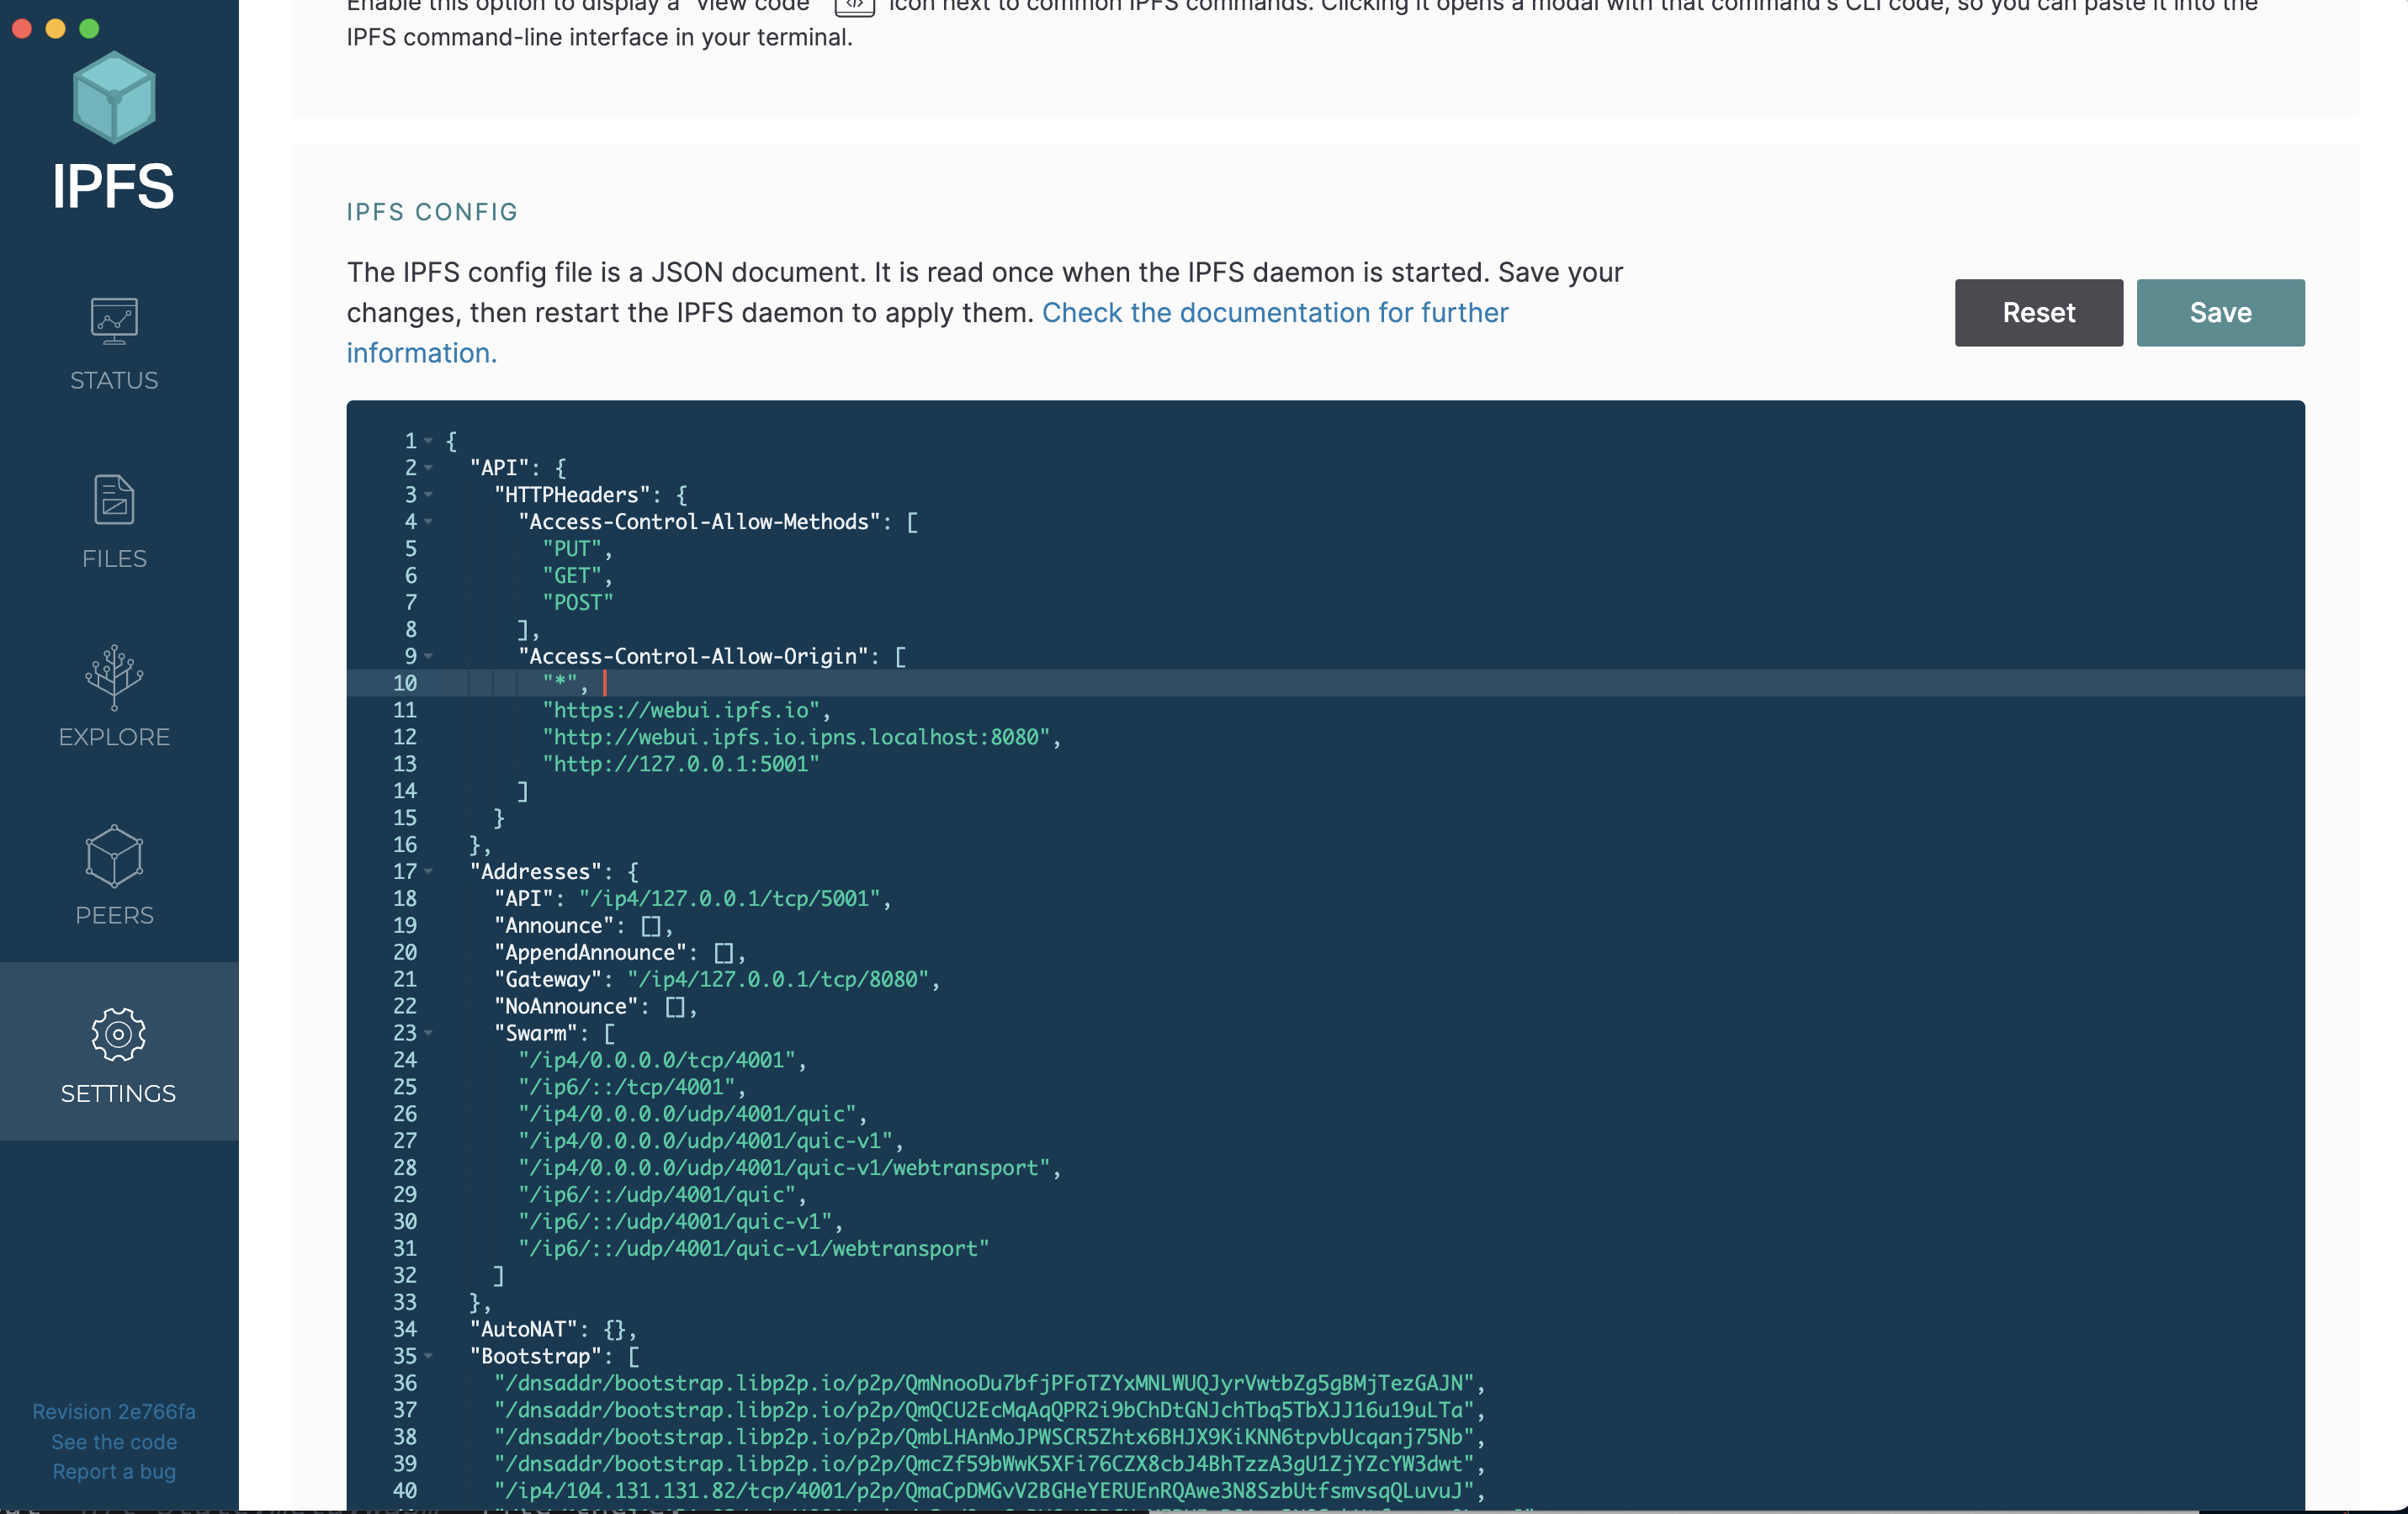 and configure the
 APIof your node:"API": {
"HTTPHeaders": {
"Access-Control-Allow-Methods": [
"PUT",
"GET",
"POST"
],
"Access-Control-Allow-Origin": [
"*",
"https://webui.ipfs.io",
"http://webui.ipfs.io.ipns.localhost:8080",
"http://127.0.0.1:5001"
]
}
}, -
Now you can upload the files from the application. Start writing the function:
...
import { useIPFS } from 'hooks';
...
export function CreateNft() {
    ...

    const ipfs = useIPFS();

    const createNft = async (e: React.FormEvent<HTMLFormElement>) => {
        e.preventDefault();

        let cid;
        if (image) {
        try {
            cid = await ipfs.add(image as File)
        } catch (error) {
                alert(error)
        }
        }
    }
    ...
} -
Next, send the message to the contract. But first, establish the required hooks. Generate a file called
api.tsin thehooksfolder.
touch src/hooks/api.ts
-
Define the hook
useNFTMetadataanduseSendNFTMessage:import { useSendMessage } from '@gear-js/react-hooks';
import metaTxt from 'assets/meta/meta.txt'
import { ADDRESS } from 'consts';
import { useMetadata } from "./useMetadata";
function useNFTMetadata() {
return useMetadata(metaTxt)
}
function useSendNFTMessage() {
const meta = useNFTMetadata()
return useSendMessage(ADDRESS.CONTRACT_ADDRESS, meta)
}
export {useNFTMetadata, useSendNFTMessage} -
Continue continue writing the
CreateNftfunction. Create thepayloadmessage and send it to the contract....
import { useAccount } from '@gear-js/react-hooks';
import { useSendNFTMessage } from 'hooks/api';
import { useNavigate } from 'react-router-dom';
...
export function CreateNft() {
...
const ipfs = useIPFS();
const { account }= useAccount();
const navigate = useNavigate();
const sendMessage = useSendNFTMessage();
const resetForm = () => {
setNftForm(NftInitialState);
setImage(null)
}
const createNft = async (e: React.FormEvent<HTMLFormElement>) => {
e.preventDefault();
let cid;
if (image) {
try {
cid = await ipfs.add(image as File)
} catch (error) {
alert(error)
}
}
const tokenMetadata = {
name: title,
description,
media: cid?.cid.toString(),
reference: "",
}
const payload = {
Mint: {
to: account?.decodedAddress,
tokenMetadata,
}
};
sendMessage(
payload,
{
onSuccess: () => {
resetForm();
navigate('/')
},
},
);
}
...
} -
The
CreateNftpage is ready. The complete code is as follows:import { useAccount } from '@gear-js/react-hooks';
import { Button, FileInput, Input } from '@gear-js/ui'
import { useIPFS } from 'hooks';
import { useSendNFTMessage } from 'hooks/api';
import { useState } from 'react'
import { useNavigate } from 'react-router-dom';
import styles from './CreateNft.module.scss'
const NftInitialState = {
title: "",
description: "",
}
export function CreateNft() {
const [nftForm, setNftForm] = useState(NftInitialState);
const [image, setImage] = useState<File | null>(null)
const { title, description } = nftForm;
const handleInputChange = (e: {target: {name: any, value: any }}) => {
const { name, value } = e.target;
setNftForm({...nftForm, [name]: value})
}
const ipfs = useIPFS();
const { account }= useAccount();
const navigate = useNavigate();
const sendMessage = useSendNFTMessage();
const resetForm = () => {
setNftForm(NftInitialState);
setImage(null)
}
const createNft = async (e: React.FormEvent<HTMLFormElement>) => {
e.preventDefault();
let cid;
if (image) {
try {
cid = await ipfs.add(image as File)
} catch (error) {
alert(error)
}
}
const tokenMetadata = {
name: title,
description,
media: cid?.cid.toString(),
reference: "",
}
const payload = {
Mint: {
to: account?.decodedAddress,
tokenMetadata,
}
};
sendMessage(
payload,
{
onSuccess: () => {
resetForm();
navigate('/')
},
},
);
}
return (
<>
<h2 className={styles.heading}> Create NFT</h2>
<div className={styles.main}>
<form className={styles.from} onSubmit={createNft}>
<div className={styles.item}>
<Input label="Name" className={styles.input} required name="title" value={title} onChange={handleInputChange}/>
</div>
<div className={styles.item}>
<Input label="Description" className={styles.input} required name="description" value={description} onChange={handleInputChange}/>
</div>
<div className={styles.item}>
<FileInput label="Image" className={styles.input} onChange={setImage}/>
{ image ? (
<div className="image-preview">
<img src={URL.createObjectURL(image)} alt="nft" style={{width: 100, height: 100}}/>
</div>
): (
<p>No image set for this NFT</p>
)}
</div>
<Button type="submit" text="Create" className={styles.button}/>
</form>
</div>
</>
)
}
The next section covers the creation of the Home page for reading and displaying the minted NFTs.
Home page
In the api.ts file, add hooks for reading the contract state.
-
First, add
useNFTState<T>, whereTis the type expected to be read (for example,Token). It’ll accept the function name and payload if required for the specified function:import stateMetaWasm from 'assets/wasm/nft_state.meta.wasm'
import { useMetadata, useWasmMetadata } from './useMetadata'
import metaTxt from 'assets/meta/meta.txt'
import { useAccount, useReadWasmState, useSendMessage } from '@gear-js/react-hooks';
import { ADDRESS } from 'consts';
function useNFTMetadata() {
return useMetadata(metaTxt);
}
function useNFTState<T>(functionName: string, payload?: any) {
const { buffer } = useWasmMetadata(stateMetaWasm);
return useReadWasmState<T>(
ADDRESS.CONTRACT_ADDRESS,
buffer,
functionName,
payload
)
} -
To read all the tokens in the contract, create the type for a token in a separate folder called
types:mkdir types
touch types/index.tsand add the
Tokendescription to theindex.tsfile:import { HexString } from "@polkadot/util/types";
type Token = {
approvedAccountIds: HexString[];
description: string;
id: string;
media: string;
name: string;
ownerId: HexString;
reference: string;
};
export type { Token }; -
Then write the
useNFTshook:...
import { Token } from 'types';
...
function useNFTs() {
const { state, isStateRead } = useNFTState<Token[]>("all_tokens", null);
return { nfts: state, isNftStateRead: isStateRead };
} -
Start writing the
Homepage:
import { Loader } from 'components';
import { useNFTs } from 'hooks/api';
import styles from './Home.module.scss'

function Home() {

const { nfts: state, isNftStateRead: isStateRead } = useNFTs();
const isAnyNft = !!nfts?.length;

return (
    <>
    <header className={styles.header}>
        <h2 className={styles.heading}>NFTs</h2>
    </header>
    {isNftStateRead ? (
        <>
        {isAnyNft && <ul className={styles.list}>Display NFTs here</ul>}
        {!isAnyNft && <h2>There are no NFTs at the moment</h2>}
        </>
    ) : (
        <Loader />
    )}
    </>
)
}
export { Home }; -
nftsare read using the previously written hookuseNFTs.const nfts = useNFTs(); -
Check whether the contract has tokens:
const isAnyNft = !!nfts?.length; -
Create a component that will display the NFT:
mkdir pages/home/nft
touch pages/home/nft/nft.tsx
and write the component:
import { Link } from "react-router-dom";
import { getIpfsAddress } from "utils";
import styles from './nft.module.scss'

type Props = {
    id: string;
    name: string;
    media: string
}

function NFT( {id, name, media }: Props) {
    const to = `/nft/${id}`;
    const src = getIpfsAddress(media)
    const text = `#${id}`
    return (
        <Link to={to} className={styles.nft}>
            <img src={src} alt={name}/>
            <h3 className={styles.heading}>{name}</h3>
            <p className={styles.text}>{text}</p>
        </Link>
    )
}

export { NFT }; -
Write a function for retrieving all NFTs from the contract in the
Home.tsxfile:...
import { NFT } from './nft/nft';
function Home() {
const { nfts: state, isNftStateRead: isStateRead } = useNFTs();
const isAnyNft = nfts?.length;
const getNFTs = () =>
nfts?.map( ({name, id, media}) => (
<li key={id}>
<NFT id = {id} name = {name} media = {media} />
</li>
))
...
}
export { Home };The whole code of the
Homepage:import { Loader } from 'components';
import { useNFTs } from 'hooks/api';
import styles from './Home.module.scss'
import { NFT } from './nft/nft';
function Home() {
const { nfts: state, isNftStateRead: isStateRead } = useNFTs();
const isAnyNft = nfts?.length;
const getNFTs = () =>
nfts?.map( ({name, id, media}) => (
<li key={id}>
<NFT id = {id} name = {name} media = {media} />
</li>
))
return (
<>
<header className={styles.header}>
<h2 className={styles.heading}>NFTs</h2>
</header>
{isNftStateRead ? (
<>
{isAnyNft && <ul className={styles.list}>{getNFTs()}</ul>}
{!isAnyNft && <h2>There are no NFTs at the moment</h2>}
</>
) : (
<Loader />
)}
</>
)
}
export { Home };